Every cat deserves a space of their own where they can climb, scratch, and rest. However, store-bought cat trees often don’t meet our specific needs or match our home decor. That’s why I decided to build my own!

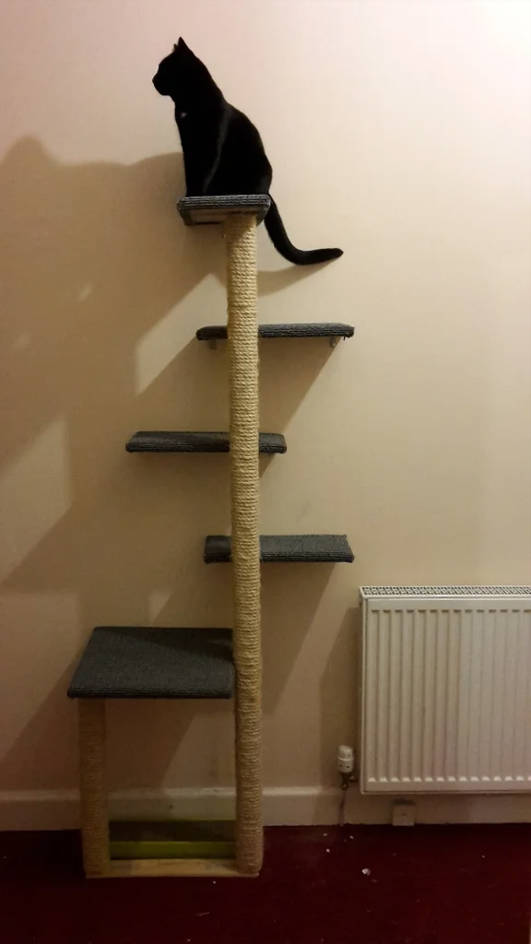
This DIY cat tree is designed for cats that love to climb, featuring a tall structure with wall-mounted platforms for stability. Follow along as we walk through the process of building a custom cat tree from scratch.
Why This DIY Cat Tree Works
- Customizable Height and Size – You can adjust the height and platform placement based on your cat’s needs and available space.
- Sturdy and Wall-Mounted – Unlike traditional free-standing cat trees, this design attaches to the wall for added security.
- Budget-Friendly – Uses affordable materials that are easy to find at home improvement stores.
- Encourages Climbing and Scratching – The sisal-wrapped post offers a perfect scratching surface, while staggered platforms encourage climbing.
- Blends with Home Decor – Unlike bulky pet store options, this design can be made to match your aesthetic.
What You Will Need
Materials:
- Square Edge Timber (2400 x 44 x 44 mm) – for the main post
- Plywood (16 mm thick) – four 20 x 40 cm pieces and one 40 x 40 cm piece
- Sisal Rope (10 mm diameter) – for wrapping the post
- Angle Brackets – 100x100x20mm for platforms, 40x40x15mm for wall attachment
- Screws and Wall Plugs – for securing platforms and posts
- Double-Sided Tape – for attaching carpet to platforms
- Optional: Carpet underlay for added comfort
- Carpet Material – to cover platforms
- Base Material – timber or plywood, minimum size 450 x 50 mm
Tools:
- Saw
- Hammer
- Screwdriver
- Drill
- Staple Gun (heavy duty)
- Stanley Knife
- Measuring Tape
- Spirit Level
How to Make It
Step 1: Prepare the Posts
To create the structure, cut the 240 cm timber into two pieces:
- 180 cm for the main post
- 60 cm for the secondary support post
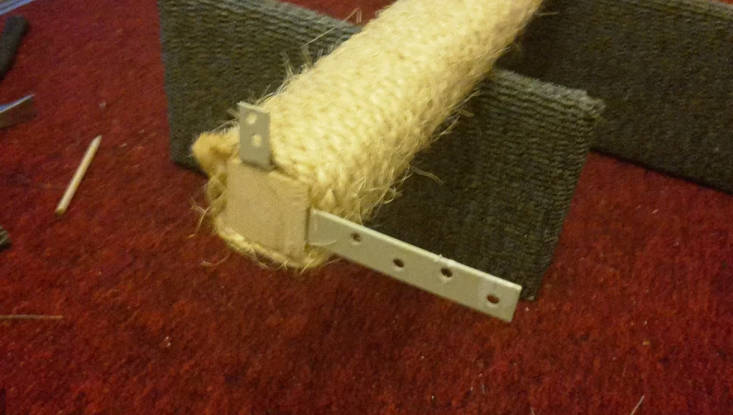
Next, attach brackets to the posts with 4x40mm screws. Drill holes before inserting screws to prevent splitting.
- 60 cm post – attach one bracket at the top and one at the bottom.
- 180 cm post – attach:
- One bracket at the bottom for securing the base
- Four brackets at 60, 90, 120, and 150 cm for the platforms
- Two brackets at the top for added stability
Step 2: Wrap the Rope Around the Posts

- Secure one end of the sisal rope with a screw to prevent slipping.
- Wrap the rope tightly around the post, keeping tension on it as you rotate the post.
- Every few turns, use a hammer to compress the rope for a tighter fit.
- Secure the rope with a screw beneath each bracket so your cat’s claws don’t get caught.
- When reaching the top, attach the rope on three sides again for durability.
Step 3: Prepare the Platforms
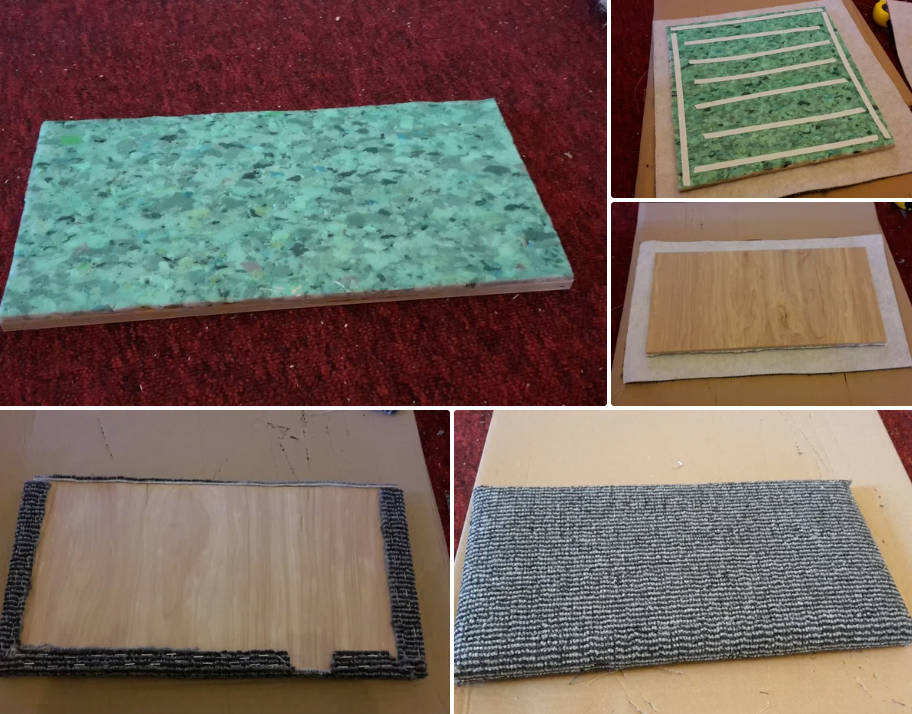
- Cut 16 mm plywood into platform sizes:
- Large base: 40 x 40 cm
- Small platforms: 20 x 40 cm each
- Optional: Cut carpet underlay to fit platforms and secure it with double-sided tape.
- Cut carpet pieces slightly larger than the platform (2-3 cm extra on each side).
- Attach carpet with double-sided tape and staple it underneath for a secure hold.
- Ensure space remains for attaching brackets to the underside of platforms.
Step 4: Assemble the Cat Tree

To put everything together, follow this sequence:
- Attach the middle platforms (90 cm, 120 cm, 150 cm) to the main post.
- Attach the top platform (180 cm) securely to the main post.
- Fix the bottom platform (40 x 40 cm) to the main post.
- Attach the short (60 cm) post to the bottom platform.
- Secure the base – plywood or timber can be used for stability.
- Fix the cat tree to the wall – use 5 x 50 mm screws and 45 mm wall plugs for secure wall attachment.
Each platform is attached to the post with two brackets, except the top platform, which only requires one. Ensure the screws fit through the brackets before drilling holes in the wall. The platforms may flex slightly but remain sturdy enough to support your cat.
Step 5: Introduce Your Cat to Their New Tree

Once everything is secured, let your cat explore! Some tips to help them adjust:
- Sprinkle catnip on the platforms.
- Place treats at different heights to encourage climbing.
- Use toys to engage them with their new space.
Additional Details
- Height: 180 cm
- Platform Placement:
- Large bottom platform: 60 cm above the ground
- Small platforms: 90 cm, 120 cm, 150 cm, 180 cm
- Platform Sizes:
- Small platforms: 20 x 40 cm
- Large platform: 40 x 40 cm
- Weight Limit: Best suited for medium-sized cats (~5 kg)
Summary
Building your own DIY cat tree is a rewarding project that allows you to create a sturdy, customizable climbing space for your cat. With sisal rope for scratching, wall-mounted platforms for stability, and a design that encourages climbing, this homemade cat tree is an excellent alternative to store-bought models.
Your feline friend will love their new perch, and you’ll love the cost-effective, stylish addition to your home!
This plan is a contribution by [Kerstin247]. Project Via Instructables – Get the PDF Instructions here.